Box Net Frame Net Video
Update – Watch Capt Lee Noga’s seminar on frame nets on YouTube. Click here to watch the box net frame net video lecture.
Box Net Frame Net – Capt Lee Noga founded the “Academy Of Shrimping” forums in 2010 as a free resource site to engage families in the sport of fishing & shrimping. She built a message board community with over 3300+ members who embrace this sport. She has dedicated her retirement years in teaching this sport both on-line and putting on seminars at local fishing clubs in Central Florida.
This is an inactive message board site and DOES NOT require you to sign up. Other shrimping sites in 2013 have attempted to copy the Academy forum resources, we assure you will not be disappointed you took the time to visit. Once you get inside be prepared to be overwhelmed with intel reports. Take the time to review the last 2 years of reports. Locations do not change, this intel is timeless. Best reports are for Central Florida and summer shrimping in the N.E.
Everyone deploys their gear different. Personally, I prefer to optimize my gear set. Many take the Shumaker 12 foot ropes from the left and right side of the box net frame net and make a bridle. To some, it is easier to tie their Shumaker box net frame net to a single cleat.
 To make a single line bridle cut the (2) ropes between (4-6 foot) and attach both ropes to a 3-4 inch SS or brass ring, then add a 3rd rope to the ring to output to boat cleat. This is one way to reduce the 2 lines to a single line to tie up to single cleat.
Here is an example of a bridle setup. The green tape rope is the rope to the cleat, the (2) black tape ropes simulate the 12 foot ropes built into the Shumaker box net frame net.
Recap – Cut down both ropes and attach to a 3-4 inch saltwater friendly ring. Add a 3rd rope to the ring which will be the rope you tie to your single cleat. SS O-rings (kind you tighten with a screwdriver) make great ways to attach these cut frame net ropes to bridle 3-4 inch ring. Tape up the 0-ring when done so you do not snag SS o-ring parts on the mono or scrape the skin off your hands
Deploying a Frame Net Box Net
You will see in this diagram that I do separate my frame net OUT of my dipping light kill zone. But, I do add the 4th light and create a field go “herding” setup for my frame net as well.
The green dots are my lights.

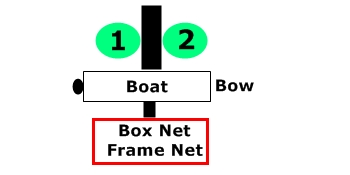
For beginners or those who want to deploy their box net frame net less technical, deploy the box net frame net off a center cleat. Note, the dark water between shrimp lights 1 and 2, night time shrimp source dark water and and if you create a dark spot they will herd into this dark area and march right into your box net frame net tied off on your center cleat behind the dippers.
If you fail to create dark water between your lights, the lights will steer them away from the opening of the frame net and it will not harvest many shrimp.
Warning – Boat owners, do NOT deploy your net from your bow if facing the current, Your dip lights off the bow will interfere and scatter the shrimp forcing them to miss your box net frame net. Deploy your net off the back of your boat by the engine in the darkness.
Diagram below is the most common frame net setup for a 2 light boat. They set their boat horizontal, bow towards the houses (West), and stern towards the East (Mosquito lagoon). Open the lights, create a black area, and the shrimp will be attracted to the dark area. This is called, “herding” and you walk them right into the mouth of the frame net tied off on a middle cleat.
Frame Net Piping Out Materials List:
- 3/4 or 1 inch galvanized 10 foot pipe, make sure it is sturdy.
- Stainless steel U-Bolts, washers and nuts
- Stainless steel adjustable 0-rings (kind you tighten with screwdriver)
- Stainless steel 1 inch rings (Home Depot) for pipe
- Brass clips for my frame box net lines, adjustable baby SS size o-rings to attach brass clips to lines attached to frame box net
- Cut down 12 foot lines that came with Shumaker frame net to 1 foot and then added brass hooks
- 30 foot nylon rope and stainless or brass clip to make my leash
- Electrical tape to wrap my o-rings on pipe and line to reduce snag factor
- Buy size pipe that will fit and slide thru your U bolts, buy O-rings size that will fit over your size pipe.
- My deck where I mounted my U-Bolts had a dip and hull rubber bumper forcing me to go up in height to clear hull rubber bumper. Bumper caught my pipe and would not slide. So I had to have taller U-bolts.
Enjoy the frame net deployment using a pipe video — Subscribe to Capt. Lee Noga YouTube channel for more educational video’s coming.